

🤷 So, what is a Micro Frontend?
Have you ever thought about using different frontend technologies in one app or project? For instance, using React.js, Vue.js, or Angular harmoniously. That's the type of freedom a micro frontend gives you.
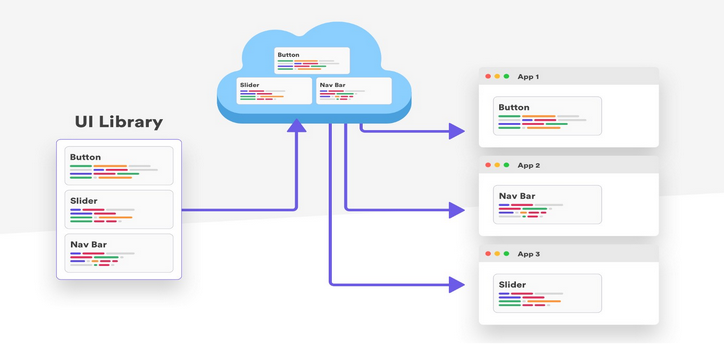
The micro frontend extends the principles of microservices to the frontend ecosystem. In this case, you can have front-end teams working together on the same project but with different technologies and shared dependencies.
The type of comfort this approach gives to development teams is out of this world. That's exactly why many top tech companies are exploring this technology, and many have tipped it as the future of front-end development. And of course, it's worth the hype!
The Advantages of Micro Frontends
You'll be surprised to see how many benefits you will get by embracing the micro frontend approach. You may be wondering about adoption, but just know that big tech companies like Apple, Netflix, and so on are already using this technology.
Below are some advantages of micro frontends :
1. Faster development and deployment 🚴
Before the advent of micro frontends, some development teams sent their members to learn a particular framework or language before they could collaborate or build together.
This will indeed slow down the development speed of the team. But with micro frontends, developers are allowed to use the framework of their choice. Hence, boosting the speed of development and deployment as deployment configurations target different packages but remain in one project.
2. Use of different tech stacks 🍡
Micro frontends are tech stack agnostic. This means that different parts of an application can work together regardless of the tech stack or framework you're using. This will increase the amount of expertise working on a project.
As everybody has the freedom to choose the framework that they know better. Roles are shared between teams in the tools that they are perfect at which is less problematic than a monolithic approach.
For instance, a product owner may act as the supervisor with full access to the project's root scripts and processes. Testers can also run tests with their favorite tools due to the decoupled micro front ends. Each framework has their own testing library with their own benefit. This type of setup promotes productivity and increases teams’ efficiency as well.
3. Less difficult to scale and maintain 🎛️
Micro frontends are easier to maintain than monolithic ones. This is simply because of the fact that each part of it is divided into smaller manageable chunks. Another thing is that everybody is involved in the testing process of the web applications, as they can work with a framework of their choice.
4. Less difficult to debug 🕵️
Errors can easily be traced in micro frontends due to webpack splitting each application into chunks or units. Unlike in the monolithic setup, a faulty unit can easily be detected and corrected.
👷♀️ Building a Micro Frontend With single-spa
Have you ever wondered why many people prefer frameworks over reinventing the wheel by writing everything in their vanilla/raw form?
The answer is simple, simplicity and conformity. single-spa removes the complexity in setting up a micro frontend app by providing boilerplates and scaffolding the entire process.
single-spa is "a javascript router for front-end microservices".
🤷 Why use single-spa?
Other micro frontend frameworks exist, but below are some reasons why we'll be using single-spa to manage our micro frontend application.
1. Use many Javascript frameworks in one application
This is a general feature of micro frontends. single-spa being a micro frontend tool enables you to use different JavaScript frameworks in the same application.
2. Deploy your micro frontends independently
With single-spa, you can easily deploy each part of your application independently with deploying the whole application. This can be very handy as it promotes agile development.
3. Lazy loading for improved load time
single-spa loads only essential components of your application on the browser. The other units can be loaded later on as per use. This practice will improve the loading speed of webpages.
4. It supports routing between micro frontends and shared resources
single-spa serves basically as a router between micro frontend and shared dependencies. It accomplishes this task with its importmap function.
State Management in Micro Frontends
State management is quite tricky in the micro frontend ecosystem. Using a single global state manager like redux, mobx, and other global state management libraries is not a recommended approach by the single-spa team.
Instead, if you wish to use a state manager in your application, it's advisable to use a state management tool to manage the state of a single micro frontend instead of a single store for all of your micro frontends.
This is so, because using a global store to manage the state of an application makes it difficult to deploy our application independently. Hence, use local component state for your application components, or a store for each of your micro frontends.
For more details on state management, See "Inter-app communication" section in the official documentation.
Module Federation
Module Federation is a feature introduced in Webpack 5, which allows you to share code between different applications running in separate environments, such as (micro frontends).
It enables applications to consume code from other applications as if it were locally available, without the need for a build step or a separate server. This allows you to build modular, scalable applications that can be developed and deployed independently.
🧠 Example : you could have an e-commerce application with a separate checkout application, and use Module Federation to share code between them, such as the shopping cart module.
💻 The tech under the hood : Module Federation works by creating a remote entry point in one application, and a remote container in another. The remote entry point exposes modules that can be consumed by other applications, and the remote container consumes those modules as if they were locally available.
single-spa Setup and Usage
We've been talking about singles. It's now time to get our feet wet by setting up a micro frontend application with single-spa. The process is rigorous. We're going to cover everything from scratch, so you don't have to worry about files that we didn't create.
Overview of the Application We're Building
We've so far covered what single-spa and module federation are. It's time to build our first micro frontend project application. I know you're wondering what this application does. Below is a breakdown of the single-spa and Module Federation application we're going to build in this section.
- A Home app that combines and uses our micro frontend apps.
- A React Navigation app that holds header and footer UI.
- A Vue.js Body app that shows the body element of the page.
The complete source code is available on GitHub.
Let’s start the building process ⤵️
1. Setting up the root folder
📦 The <span class="css-span">package.json</span>
Before implementing the micro frontends app, we need a <span class="css-span">package.json</span> file at the root. The three apps are included in one repo as a monorepo, so we’ll use yarn workspaces to share some packages across the entire app.
Create the <span class="css-span">package.json</span> at project root
Before we get started with our micro frontends app creation, create a <span class="css-span">package.json</span> file at the root. I'll be using a yarn workspace.
Add the code below to <span class="css-span">package.json</span> :
<pre><code>
{
"name": "xotoboil-simple-multifront",
"version": "1.0.0",
"private": true,
"workspaces": [ "packages/*"
],
"scripts": {
"start": "concurrently \"wsrun --parallel start\""
},
"devDependencies": {
"concurrently": "^5.3.0",
"html-webpack-plugin": "5.5.0",
"single-spa": "^5.8.3",
"typescript": "5.0.2",
"webpack": "latest",
"webpack-cli": "^4.3.0",
"webpack-dev-server": "^3.11.1",
"wsrun": "^5.2.4" },
"dependencies": {
"@types/single-spa-react": "^4.0.0"
}
}</code></pre>
Run the code below to install all dependencies :
<pre><code>yarn</code></pre>
2. Building the Home App
This Home App holds other micro frontends applications. This App is where all the other micro frontend applications are used together. It performs the task of rendering HTML pages and the JavaScript that registers the applications.
Our Home folder structure will look like this:
<pre><code>├── packages
│ └── home
│ ├── public
│ │ └── index.html
│ ├── src
│ │ └── index.ts
│ ├── package.json
│ ├── tsconfig.json
│ └── webpack.config.js</code></pre>
We'll create these files one after the other.
- Create the <span class="css-span">packages</span> folder at the root of the project. Also create a <span class="css-span">home</span> folder inside it.
<pre><code>mkdir ./packages/home</code></pre>
- Create the <span class="css-span">package.json</span> file inside the packages folder. Add the following code to it :
<pre><code>{
"name": "home",
"scripts": {
"start": "webpack serve --port 3000",
"build": "webpack --mode=production"
},
"version": "1.0.0",
"private": true,
"devDependencies": {
"@babel/core": "^7.8.6",
"@babel/preset-typescript": "^7.12.7",
"babel-loader": "^8.2.2"
}
}</code></pre>
- Next, create the <span class="css-span">tsconfig.json</span> file and add the following code :
<pre><code>{
"compilerOptions": {
"target": "es5",
"moduleResolution": "node",
"module": "ESNext",
"strict": true,
"esModuleInterop": true,
"skipLibCheck": true,
"forceConsistentCasingInFileNames": true
}
}</code></pre>
- Finally, create the <span class="css-span">webpack.config.js</span> file and add the codes below :
<pre><code>const path = require('path')
const HtmlWebpackPlugin = require('html-webpack-plugin')
const ModuleFederationPlugin = require('webpack/lib/container/ModuleFederationPlugin')
const outputPath = path.resolve(__dirname, 'dist')
module.exports = {
entry: './src/index',
cache: false,
mode: 'development',
devtool: 'source-map',
optimization: {
minimize: false,
},
output: {
publicPath: 'http://localhost:3000/',
},
resolve: {
extensions: ['.jsx', '.js', '.json', '.ts', '.tsx'],
},
devServer: {
contentBase: outputPath,
},
module: {
rules: [
{
test: /\.tsx?$/,
loader: require.resolve('babel-loader'),
options: {
presets: [require.resolve('@babel/preset-typescript')],
},
},
],
},
plugins: [
new ModuleFederationPlugin({
name: 'home',
library: { type: 'var', name: 'home' },
filename: 'remoteEntry.js',
remotes: {
},
exposes: {
},
shared: [ 'react' ],
}),
new HtmlWebpackPlugin({
template: './public/index.html',
}),
],
}</code></pre>
This is a basic webpack configuration. You'll understand how everything works better in the following section using <span class="css-span">remotes</span>, <span class="css-span">exposes</span>, and <span class="css-span">shared parameters</span> :
1. Remotes
The remotes field takes the name of the federated micro frontend app to consume the code. Our home app will use a navigation app and body app in this case. Hence, we need to specify the name of them in the <span class="css-span">remotes</span> field. Here's how the remotes parameter will soon look like for our Home App.
<pre><code>remotes: {
navigation: 'navigation',
body: 'body',
}</code></pre>
2. Exposes
The <span class="css-span">exposes</span> parameter is used to export files to other applications. For example, if you want other applications to access button component, you can do it this way.
<pre><code>exposes: {
Button: './src/Button',
}</code></pre>
We aren’t going to build a Button component for now, so keep the exposes object blank..
3. Shared
This parameter has a list of all <span class="css-span">shared</span> dependencies in support of exported files. For instance, if you export React's components, you will have to list them containing React.
<pre><code>shared: ['react']</code></pre>
This prevents duplication of packages and libraries in our micro frontend application.
Now, we create <span class="css-span">public/index.html</span> file and add the code below :
<pre><code><!DOCTYPE html>
<html lang="en">
<head>
<link rel="stylesheet" href="https://cdn.rawgit.com/filipelinhares/ress/master/dist/ress.min.css" />
<link rel="stylesheet" href="https://fonts.googleapis.com/css?family=Oswald:300,400,500,600,700|Roboto:400,700&display=swap" />
</head>
<body>
<main>
body
</main>
</body>
</html></code></pre>
And finally create a <span class="css-span">src/index.ts</span> file and add the codes below :
<pre><code>import { start } from 'single-spa'
start()</code></pre>
We’ll soon add more to <span class="css-span">index.ts</span> file when we register a new application.
The files we created so far will be used to register our micro frontends app in the home app.
3. Building the Navigation App
We're done with the setup of our home app, let’s implement the navigation app in React.
Below is the folder structure of our micro frontend application that we’ll get after adding the navigation app :
<pre><code>├── packages
│ ├── home
│ │ ├── package.json
│ │ ├── public
│ │ │ └── index.html
│ │ ├── src
│ │ │ └── index.ts
│ │ ├── tsconfig.json
│ │ └── webpack.config.js
│ └── navigation
│ ├── package.json
│ ├── src
│ │ ├── Footer.tsx
│ │ ├── Header.tsx
│ │ └── index.ts
│ ├── tsconfig.json
│ ├── webpack.config.js</code></pre>
In this, we are going to create two components — Header and Footer. We will export the components to the home app that we built earlier.
To do that, we first have to create navigation app files.
- Create a folder called <span class="css-span">navigation</span> inside the packages folder
- Create a <span class="css-span">package.json</span> file inside the navigation folder and add the code below :
<pre><code>{
"name": "navigation",
"scripts": {
"start": "webpack serve --port 3001",
"build": "webpack --mode=production"
},
"version": "1.0.0",
"private": true,
"devDependencies": {
"@babel/core": "^7.8.6",
"@babel/preset-react": "^7.12.10",
"@babel/preset-typescript": "^7.12.7",
"@types/react": "^17.0.0",
"@types/react-dom": "^17.0.0",
"babel-loader": "^8.2.2",
"single-spa-react": "^3.2.0"
},
"dependencies": {
"@babel/preset-env": "^7.20.2",
"react": "^17.0.1",
"react-dom": "^17.0.1",
"ts-loader": "^9.4.2"
}
}</code></pre>
We will use React in building our navigation app. So we will be installing it as a dependency as you can see above.
- Next, create a <span class="css-span">tsconfig.json</span> file inside the navigation folder. Add this code inside it :
<pre><code>{
"compilerOptions": {
"jsx": "react",
"target": "es5",
"moduleResolution": "node",
"module": "ESNext",
"strict": true,
"esModuleInterop": true,
"skipLibCheck": true,
"forceConsistentCasingInFileNames": true
}
}</code></pre>
- Finally, create a <span class="css-span">webpack.config.js</span> inside navigation folder and add the code below :
<pre><code>const ModuleFederationPlugin = require("webpack/lib/container/ModuleFederationPlugin");
const path = require("path");
const outputPath = path.resolve(__dirname, "dist");
module.exports = {
entry: "./src/index.ts",
cache: false,
mode: "development",
devtool: "source-map",
optimization: {
minimize: false,
},
output: {
publicPath: "http://localhost:3001/",
},
resolve: {
extensions: [".jsx", ".js", ".json", ".ts", ".tsx"],
},
devServer: {
contentBase: outputPath,
},
module: {
rules: [
{
test: /\.(js|jsx)$/,
exclude: /node_modules/,
use: ["babel-loader"],
},
{
test: /\.(ts|tsx)$/,
exclude: /node_modules/,
use: ["ts-loader"],
},
],
},
plugins: [
new ModuleFederationPlugin({
name: "navigation",
library: { type: "var", name: "navigation" },
filename: "remoteEntry.js",
remotes: {},
exposes: {
"./Header": "./src/Header",
"./Footer": "./src/Footer",
},
shared: ["react", "react-dom", "single-spa-react"],
}),
],
};</code></pre>
👷♂️ More about the above <span class="css-span">webpack.config.js</span>
If you go through the codes, you'll see a line containing <span class="css-span">publicPath</span> inside output
<pre><code>output: {
publicPath: "http://localhost:3001/",
}</code></pre>
<span class="css-span">publicPath</span> is the base name of the remote URL that our home app will use. In this case, the navigation app will be served at <span class="css-span">http://localshot:3001</span>
<span class="css-span">Header</span> and <span class="css-span">Footer</span> components will be exported to the Home app as they're in the values of exposes parameter.
<pre><code>exposes: {
"./Header": "./src/Header",
"./Footer": "./src/Footer",
},</code></pre>
Shared has a list of libraries that we are sharing. In this case, we need to write <span class="css-span">react</span>, <span class="css-span">react-dom</span>, and <span class="css-span">single-spa-react</span>. As we're building our application with React library.
<pre><code>shared: ["react", "react-dom", "single-spa-react"]</code></pre>
4. Creating Header and Footer Components
Create a <span class="css-span">src/Header.tsx</span> file and insert the code below :
<pre><code>import React from "react";
import ReactDOM from "react-dom";
import singleSpaReact from "single-spa-react";
const Header: React.VFC = () => {
return (
<header
style={{
width: "100%",
background: "#6565bf",
color: "#FFFFFFFF",
padding: "1rem",
minHeight: "50px",
}}
>
Header from React
</header>
);
};
const lifecycles = singleSpaReact({
React,
ReactDOM,
rootComponent: Header,
});
export const bootstrap = lifecycles.bootstrap;
export const mount = lifecycles.mount;
export const unmount = lifecycles.unmount;</code></pre>
- Create a <span class="css-span">src/Footer.tsx</span> file and insert the code below :
<pre><code>import React from "react";
import ReactDOM from "react-dom";
import singleSpaReact from "single-spa-react";
const Footer: React.VFC = () => {
return (
<footer
style={{
width: "100%",
background: "#6565bf",
color: "#FFFFFFFF",
padding: "1rem",
minHeight: "50px",
}}
>
Footer from React
</footer>
);
};
const lifecycles = singleSpaReact({
React,
ReactDOM,
rootComponent: Footer,
});
export const bootstrap = lifecycles.bootstrap;
export const mount = lifecycles.mount;
export const unmount = lifecycles.unmount;</code></pre>
- Finally, create a <span class="css-span">src/index.ts</span> file and add the following code :
<pre><code>import "./Footer"
import "./Header"</code></pre>
5. Registering the Navigation Application
We're done with our Navigation App, It's now time to register it in the Home application.
To register the micro frontend app, the following steps are required :
- Include the <span class="css-span">script</span> tag
- List in remotes
- Register the app
- Include a container div
We'll take the steps one after the other.
- Include the script tag in <span class="css-span">home/public/index.html</span> file.
In order to use the code from the navigation app, we have to include it in the HTML file.
To do so, go to <span class="css-span">home/public/index.html</span> and add the <span class="css-span">publicPath</span> of the navigation app in the script tag. Include the script tag as shown in the code below :
<pre><code><!DOCTYPE html>
<html lang="en">
<head>
<script src="<http://localhost:3001/remoteEntry.js>"></script>
...
</head></code></pre>
- List in remotes
Next, go to <span class="css-span">home/webpack.config.js</span> and specify the navigation app in the remotes section like below :
<pre><code>remotes: {
home-nav: 'navigation',
},</code></pre>
We are using <span class="css-span">navigation</span> as it is the name we used in the configuration in <span class="css-span">navigation/webpack.config.js</span> file.
The <span class="css-span">home-nav</span> is the name used in the home app to refer to the navigation app.
- Register the app
Next, go to the <span class="css-span">home/src/index.ts</span> file to register a navigation application. Change the code so that it looks like below :
<pre><code>import { registerApplication, start } from "single-spa";
registerApplication(
"header",
// @ts-ignore
() => import("home-nav/Header"),
(location) => location.pathname.startsWith("/")
);
registerApplication(
"footer",
// @ts-ignore
() => import("home-nav/Footer"),
(location) => location.pathname.startsWith("/")
);
start();</code></pre>
- Include a DIV container
We are almost done. It's now time to add a DIV container to hold the footer and header component.
Go to <span class="css-span">home/public/index.html</span> and add them :
<pre><code><body>
<div style="height: 100%; display: flex; flex-direction: column;">
<div id="single-spa-application:header"></div>
<main>
body
</main>
<div id="single-spa-application:footer"></div>
</div>
</body></code></pre>
🤖 single-spa by default will search for the id <span class="css-span">single-spa-application:{app name}</span> and render the HTML there.
In this case, we’ve already registered the Header and Footer as “header” and “footer” so it will find the id — <span class="css-span">single-spa-application:header and single-spa-application:footer</span>
- Let’s run this Application
Run the code below again, to install all dependencies :
<pre><code>yarn</code></pre>
And start the server from the root folder :
<pre><code>yarn start</code></pre>
Navigate to <span class="css-span">http://localhost:3000</span> and you will find that two React components rendered successfully.
❤️🔥 Congratulations on your new app. Let's keep the fire burning ⤵️
6. Building the Home Application
We're almost done. It's now time to build our Body App. The process is very similar to the one we did for the Navigation Application.
The folder structure of our Body App will look like this :
<pre><code>├── packages
│ ├── body
│ │ ├── package.json
│ │ ├── src
│ │ │ ├── App.vue
│ │ │ ├── app.js
│ │ │ └── index.js
│ │ ├── tsconfig.json
│ │ └── webpack.config.js</code></pre>
- Create a folder <span class="css-span">body</span> inside the packages folder
<pre><code>mkdir packages/body</code></pre>
- Create <span class="css-span">body/package.json</span> and add the code below :
<pre><code>{
"name": "body",
"scripts": {
"start": "webpack serve --port 3002",
"build": "webpack --mode=production"
},
"version": "1.0.0",
"private": true,
"devDependencies": {
"@babel/core": "^7.8.6",
"@babel/preset-env": "^7.10.3",
"@vue/compiler-sfc": "^3.0.0-rc.10",
"babel-loader": "^8.2.2",
"css-loader": "^3.5.3",
"postcss-loader": "^4.1.0",
"sass": "^1.60.0",
"sass-loader": "^10.1.0",
"style-loader": "2.0.0",
"vue-loader": "16.0.0-beta.7",
"vue-style-loader": "^4.1.2"
},
"dependencies": {
"autoprefixer": "^10.1.0",
"postcss": "^8.2.1",
"single-spa-vue": "^2.1.0",
"vue": "^3.0.0"
}
}</code></pre>
From the above file, you can see that we're using <span class="css-span">Vuejs</span> as one of the dependencies instead of React for this app.
- Next, create a <span class="css-span">tsconfig.json</span> and add the code below :
<pre><code>{
"compilerOptions": {
"target": "es5",
"moduleResolution": "node",
"module": "ESNext",
"strict": true,
"esModuleInterop": true,
"skipLibCheck": true,
"forceConsistentCasingInFileNames": true
}
}</code></pre>
- Finally, create a <span class="css-span">body/webpack.config.js</span> and add the code below :
<pre><code>const ModuleFederationPlugin = require("webpack/lib/container/ModuleFederationPlugin");
const path = require("path");
const outputPath = path.resolve(__dirname, "dist");
const { VueLoaderPlugin } = require("vue-loader");
module.exports = {
entry: "./src/index.ts",
cache: false,
mode: "development",
devtool: "source-map",
optimization: {
minimize: false,
},
output: {
publicPath: "http://localhost:3002/",
},
resolve: {
extensions: [".jsx", ".js", ".json", ".ts", ".tsx", ".vue"],
},
devServer: {
contentBase: outputPath,
},
module: {
rules: [
{
test: /\.s[ac]ss$/i,
use: [
"vue-style-loader",
"style-loader",
"css-loader",
"postcss-loader",
"sass-loader",
],
},
{
test: /\.vue$/,
loader: "vue-loader",
},
{
test: /\.js$/,
loader: "babel-loader",
},
{
test: /\.tsx?$/,
loader: "ts-loader",
options: {
appendTsSuffixTo: [/\.vue$/],
},
exclude: /node_modules/,
},
],
},
plugins: [
new VueLoaderPlugin(),
new ModuleFederationPlugin({
name: "body",
library: { type: "var", name: "body" },
filename: "remoteEntry.js",
remotes: {},
exposes: {
"./Body": "./src/app",
},
shared: ["vue", "single-spa", "single-spa-vue"],
}),
],
};</code></pre>
As you can see, we’re exposing the <span class="css-span">Body</span> component from this app.
- Next, let’s add the Vue component
Create a <span class="css-span">body/src/App.vue</span> and add the code below :
<pre><code><template>
<div class="body">
<div class="body--container">
Body from Vue.js
</div>
</div>
</template>
<style scoped lang="scss">
.body {
height: 100%;
display: flex;
justify-content: center;
align-items: center;
&--container {
width: 100%;
height: 300px;
display: flex;
padding: 1rem;
color: white;
align-items: center;
background: #42b983;
}
}
</style></code></pre>
- Next, create a <span class="css-span">body/src/app.ts</span> and insert the following code :
<pre><code>import singleSpaVue, { AppOptions } from "single-spa-vue";
import { h, createApp, render } from "vue";
import App from "./App.vue";
const lifecycles = singleSpaVue({
createApp,
async appOptions(props: AppOptions) {
return h(App, {
props: {
// single-spa props are available on the "this" object. Forward them to your component as needed.
// <https://single-spa.js.org/docs/building-applications#lifecyle-props>
name: props.name,
mountParcel: props.mountParcel,
singleSpa: props.singleSpa,
},
});
},
});
export const bootstrap = lifecycles.bootstrap;
export const mount = lifecycles.mount;
export const unmount = lifecycles.unmount;</code></pre>
- Then create a <span class="css-span">index.ts</span> which imports the app component.
<pre><code>import "./app"</code></pre>
- Finally, create a <span class="css-span">src/declarations/shims-vue.d.ts</span> file and add the code below :
<pre><code>declare module "*.vue" {
import type { DefineComponent } from "vue";
const component: DefineComponent<{}, {}, any>;
export {component}
}</code></pre>
7. Registering The Body Application
Next, let’s register the body in the home app as we did before for the navigation app.
- Go to <span class="css-span">home/public/index.html</span> and add another script tag for the Body App :
<pre><code><head>
<script src="<http://localhost:3001/remoteEntry.js>"></script>
<script src="<http://localhost:3002/remoteEntry.js>"></script>
...
</head></code></pre>
<span class="css-span">[http://localhost:3002/remoteEntry.js](http://localhost:3002/remoteEntry.js)</span> is the publicPath for our Body component as mentioned in the <span class="css-span">webpack.config.js</span> of the Body app.
- Then go to <span class="css-span">home/webpack.config.js</span> file and add <span class="css-span">home-body</span> to the remotes object :
<pre><code>remotes: {
'home-nav': 'navigation',
'home-body': 'body',
}</code></pre>
- Finally, go to <span class="css-span">home/src/index.ts</span> to register it :
<pre><code>import { registerApplication, start } from "single-spa";
registerApplication(
"header",
// @ts-ignore
() => import("home-nav/Header"),
(location) => location.pathname.startsWith("/")
);
registerApplication(
"footer",
// @ts-ignore
() => import("home-nav/Footer"),
(location) => location.pathname.startsWith("/")
);
registerApplication(
"body",
// @ts-ignore
() => import("home-body/Body"),
(location) => location.pathname.startsWith("/")
);
start();</code></pre>
We added another <span class="css-span">registerApplication</span> function call for the body app.
8. Running Our Full Application
Once again, install all dependencies at the root :
<span class="css-span">yarn</span>
And start the server :
<span class="css-span">yarn start</span>
Navigate to http://localhost:3000 to view the application.

🤜 Congratulations ! you’ve created your first micro frontend application with single-spa, React, and Vue!
9. In Conclusion
In conclusion, single-spa is a powerful tool for building complex web applications using multiple frameworks and micro services.
Its modular and flexible architecture allows developers to create seamless and efficient user experiences while maintaining independence between the different parts of the application.
With its extensive documentation and active community, single-spa is a great choice for developers and large companies looking to streamline and scale their development process to deliver high-quality applications without the need to rely on any single framework.
➡️ To learn more about single-spa, visit the single-spa example page.
Thank and see you on the next one 🚀 !


.svg)
%20(1).jpeg)
Toujours avec le sourire et un café dans la main, c’est la manière de travailler de Grégoire. Son pire ennemi : le pessimiste ! D’ailleurs, ça lui tient très à cœur d’avoir un travail épanouissant qui saura assouvir sa curiosité.
Grégoire touche aussi bien au front qu’au backend : TypeScript, Java, Vue, Angular, React… c’est son toolkit de prédiction. Bien qu’il soit globe-trotter confirmé, il lui reste encore des contrées à parcourir pour atteindre son objectif :visiter tous les pays du monde.


.svg)


.svg)